Sola-Site-Logo
Search

Home » Blog » How to Mount a Pergola on a Deck Safely: Weight Capacity, Joists & Attachment Guide

How to Mount a Pergola on a Deck Safely: Weight Capacity, Joists & Attachment Guide

How to Mount a Pergola on a Deck Safely Weight Capacity, Joists & Attachment Guide

Adding a shaded canopy to an elevated outdoor platform is one of the most rewarding home upgrades. However, when homeowners research how to install a pergola on deck, the primary concern is structural integrity: Can a deck support a pergola safely without damaging the decking or collapsing under high winds?

While many generic guides advise you to simply bolt the frame down, improperly anchoring a heavy structure can crack composite decking, cause dangerous frame sway, or compromise under snow and wind loads.

In this engineering-focused guide, we break down the exact mathematical load formulas, joist attachment techniques, composite deck waterproofing rules, and wind uplift resistance strategies needed to secure your deck pergola for decades.

📌 Note: This article is part of our comprehensive series on deck shade solutions. For design ideas, check out our companion guide: 15 Modern Pergola on Deck Ideas: Safety, Weight Capacity & Solar Louvered Designs.

Can a Deck Support a Pergola? The Load Capacity Formula

Yes, your deck can support a pergola. Why can you be so confident that your elevated deck won't collapse under a new shade structure? Because standard residential decks in North America are built to strict building codes (IRC - International Residential Code) designed to hold thousands of pounds of moving weight.

Residential decks are engineered to support a minimum total capacity of 50 lbs per square foot (psf), which is split into two categories:

  • Live Load (40 psf): Temporary weight, such as people, patio furniture, grills, and seasonal snow.

  • Dead Load (10 psf): Permanent weight of the framing, decking boards, and railings.

DECK LOAD CAPACITY FORMULA
Total Deck Area (sq. ft.) × 50 lbs/sq. ft. = Maximum Load Capacity 
Example: A 12' × 16' deck (192 sq. ft.) can support up to 9,600 lbs of combined weight (deck structure + pergola + furniture + snow).

What This Means in Real Life

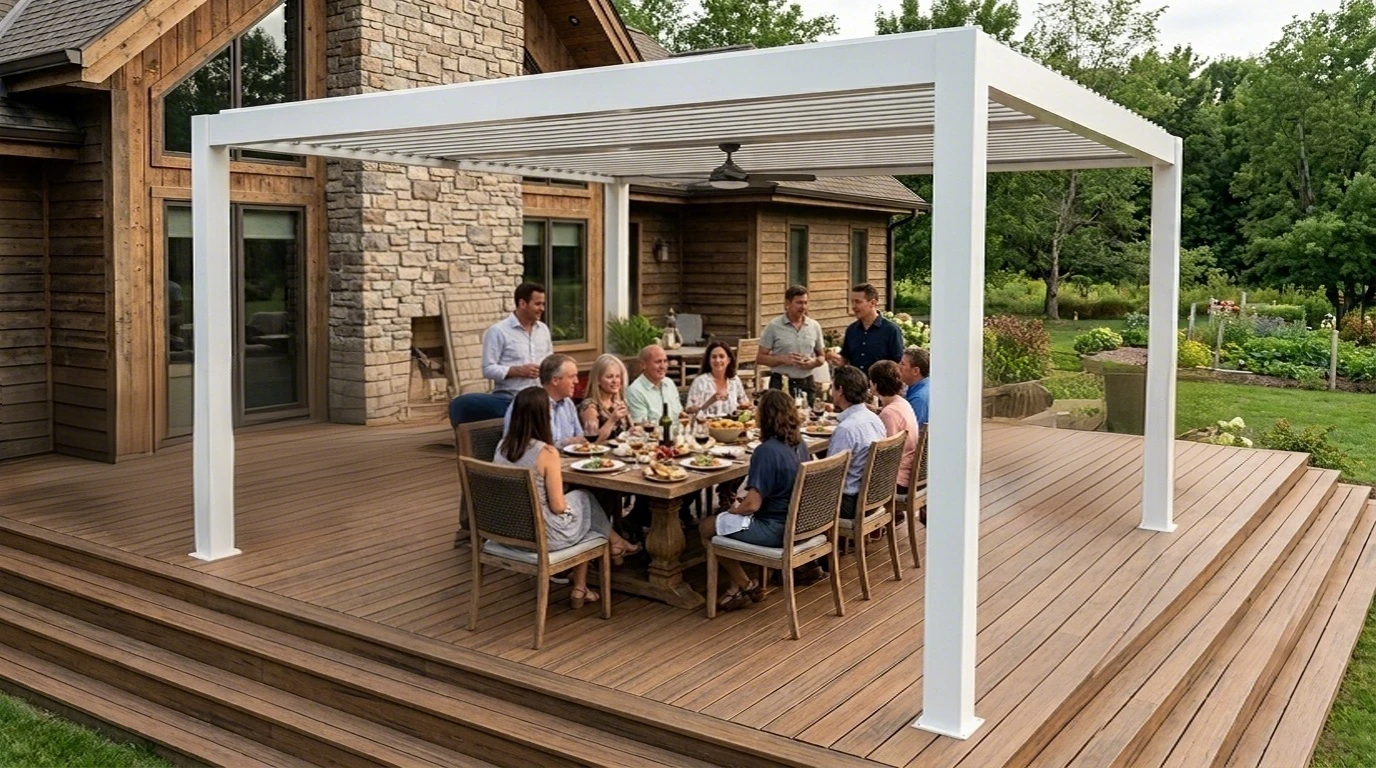
If a 12' x 16' deck can support 9,600 lbs, a modern lightweight aluminum pergola (which typically weighs between 450 to 700 lbs) consumes less than 7% of your deck's total structural capacity! Even when host a 12-person dinner party surrounded by heavy outdoor furniture, your deck framing operates well within its safe engineering margin.

Material Choice Breakdown: Wood vs. Vinyl vs. Aluminum

While your deck can handle a pergola, choosing the right material ensures you preserve maximum "live load budget" for your family and guests:

MaterialAverage Weight (10'x14' Unit)Deck Impact & LifespanMaintenance Level
Pressure-Treated Wood / Cedar1,200 – 2,200+ lbsExtremely heavy dead load; absorbs rain, adding hundreds of wet poundsRequires sealing, staining, and rot prevention every 1–2 years
Vinyl / PVC800 – 1,100 lbsModerate weight; requires internal steel inserts to prevent saggingLow maintenance, but susceptible to brittle cracking in cold weather
Engineered Powder-Coated Aluminum450 – 700 lbsLightweight & High-Strength; leaves 90%+ load capacity for guestsZero maintenance; 100% rustproof, rot-proof, and insect-proof

By choosing an aluminum louvered pergola, you gain maximum structural peace of mind without over-stressing your deck posts.

How to Anchor a Pergola to a Deck: Step-by-Step Framing Method

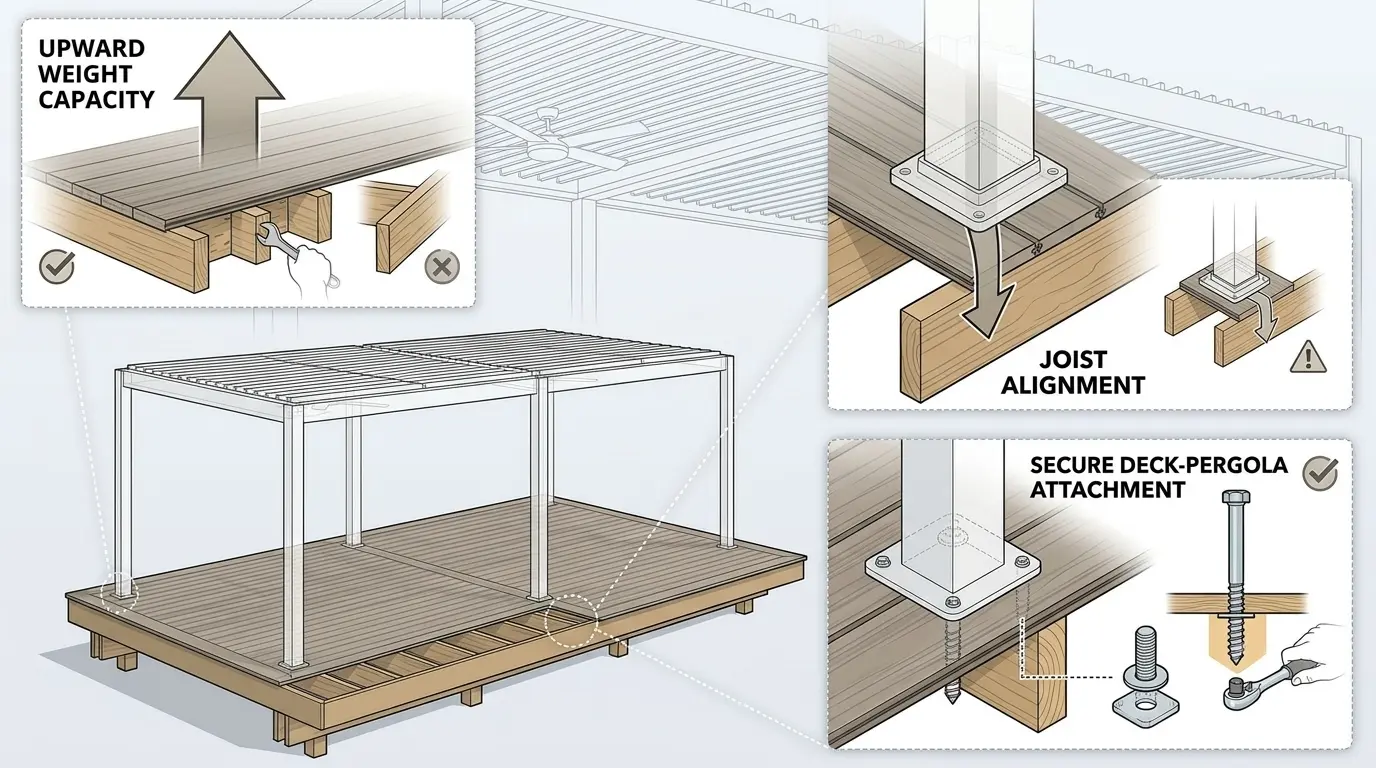
To ensure your pergola for deck installation stays completely rigid during high winds, the golden rule of installation is: Anchor post flanges directly into structural framing or blocking beneath the floorboards—never into surface deck boards alone.

Surface decking boards (whether 5/4 cedar or composite) are designed for foot traffic, not point-load structural tension. Under strong wind gusts, surface screws will easily pull loose. Here is the professional installation method:

Step 1: Locate Structural Joists

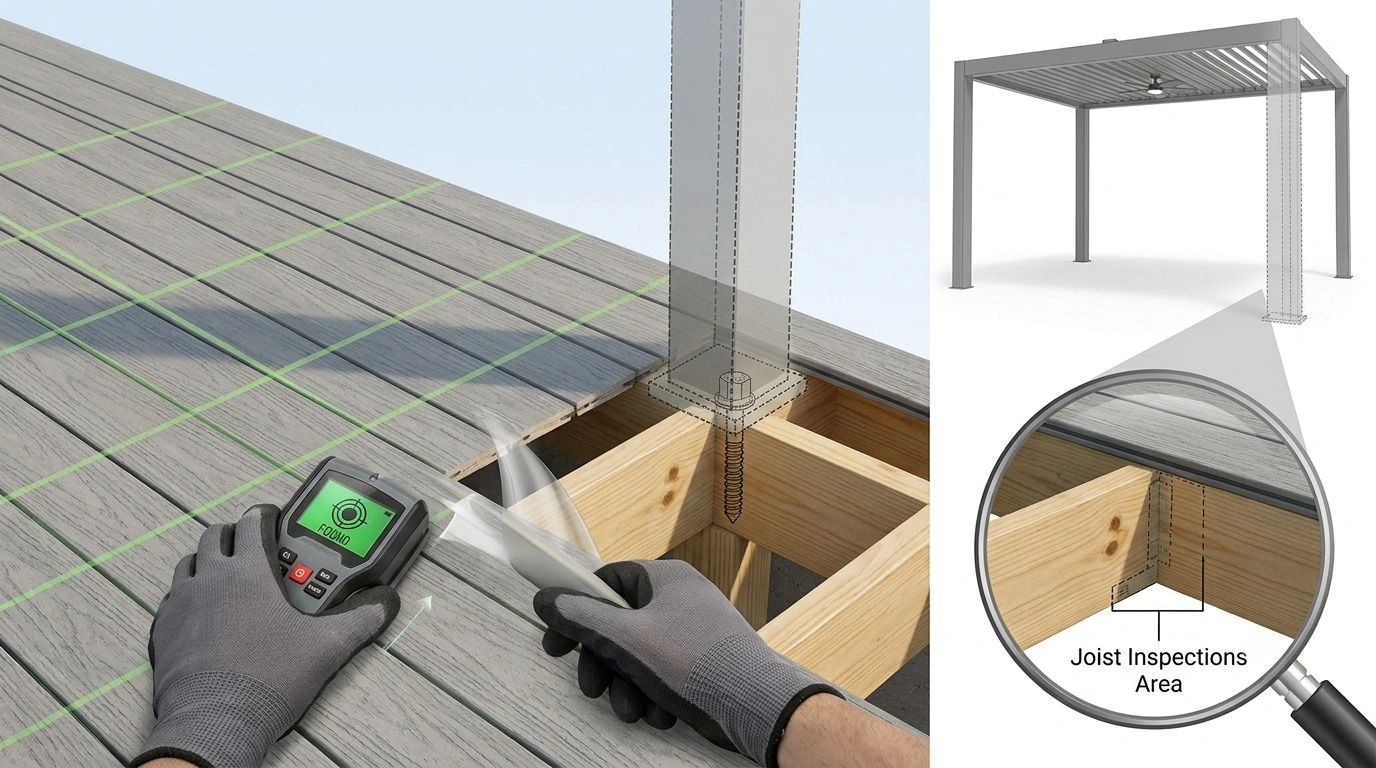
Using stud finder to locate deck wood joists for pergola post installation

Before drilling, locate the underlying wood joists (spaced 12" or 16" on-center) beneath your deck surface using a stud finder or by inspecting the underside of your deck frame.

Step 2: Install Under-Deck "Blocking"

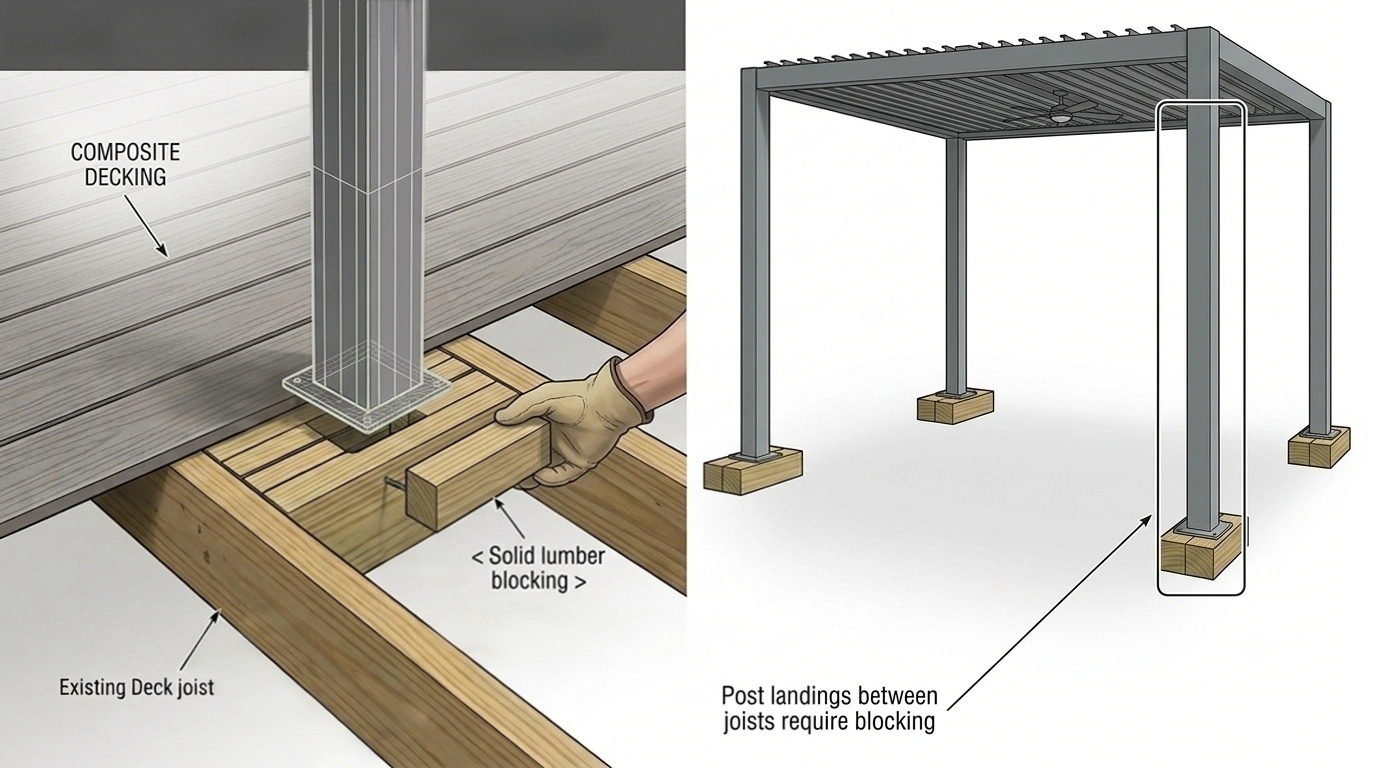
Step2-Install solid lumber blocking between deck joists to support pergola posts

In many layouts, a pergola post lands in a spot between two joists rather than directly on top of one.

  • The Engineering Fix: Install solid lumber blocking underneath the floorboards.

  • Cut 2x8 or 2x10 pressure-treated blocks to bridge the gap between adjacent joists directly under the post location. Fasten them with structural timber screws to create a solid 3-to-4-inch thick wood foundation.

Step 3: Fasten Post Flanges with Structural Lag Bolts

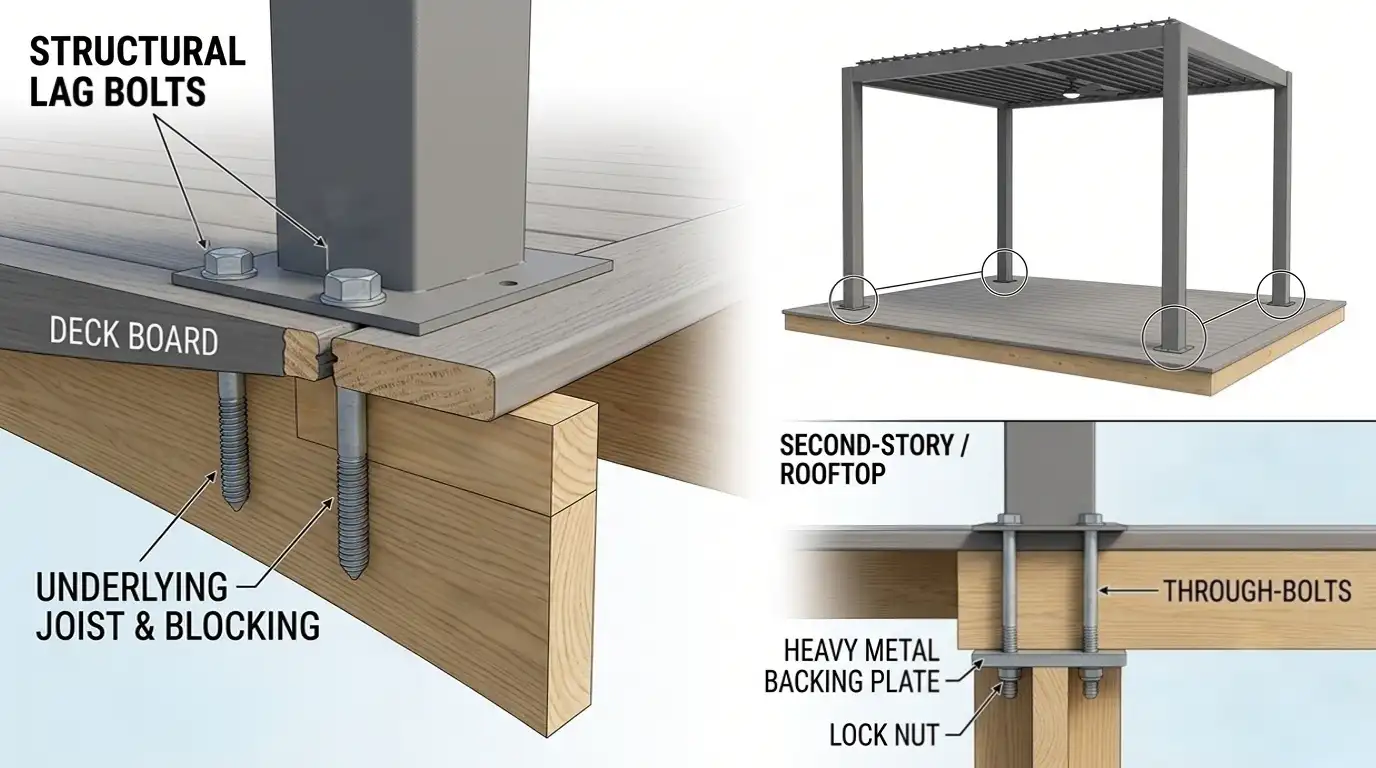
Step3-Secure pergola posts with lag bolts- use through-bolts for elevated decks
  • Place heavy-duty powder-coated steel post flanges over your mounting locations.

  • Drive 3/8-inch or 1/2-inch hot-dipped galvanized or 316 stainless steel lag bolts through the deck board and deep into the underlying joist and blocking.

  • For second-story or rooftop elevated decks, use through-bolts with heavy metal backing plates and lock nuts underneath the framing.

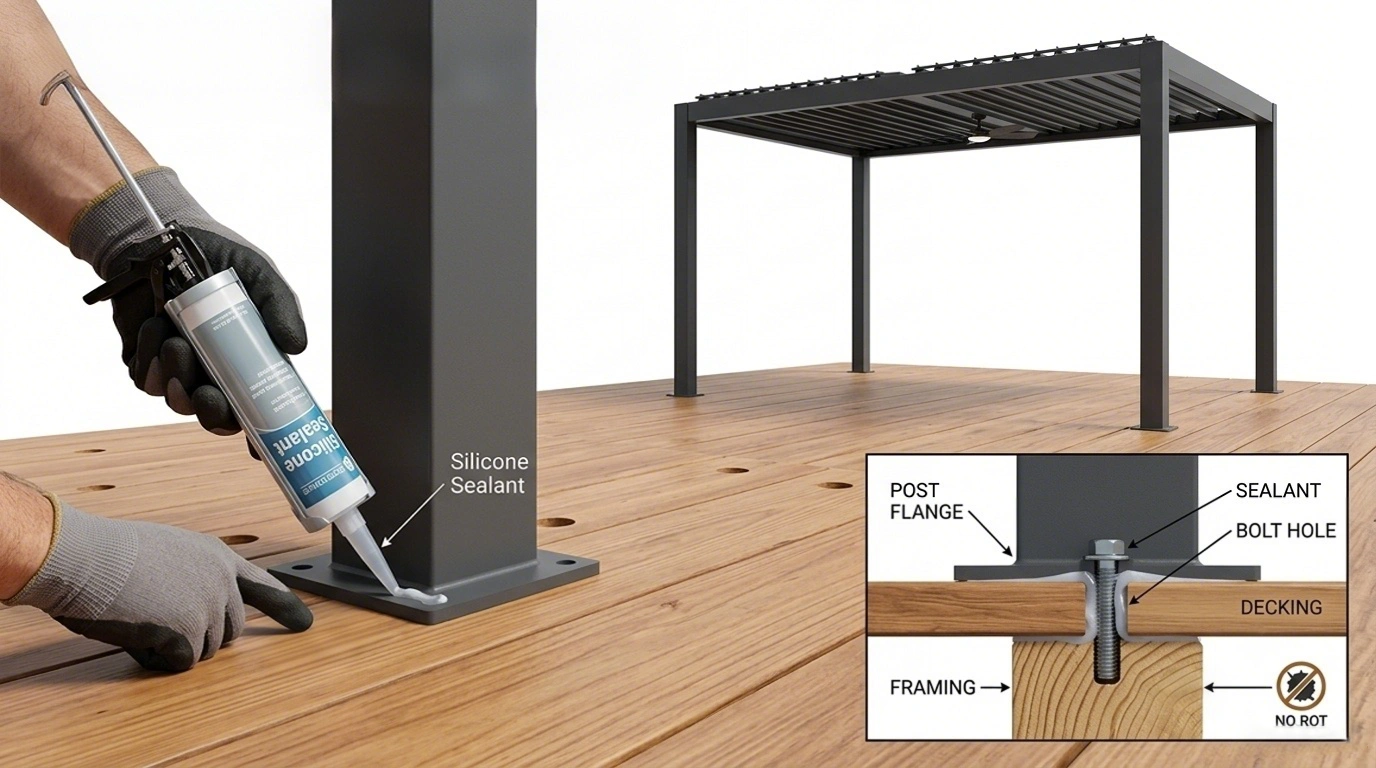
Step 4: Apply Waterproof Sealant

Step4-Applying silicone sealant around pergola post bolt holes to waterproof deck and avoid wood rot

Prevent moisture from trapping under post flanges by applying marine-grade silicone or butyl tape around each bolt hole. This protects the newly drilled framing against rot for decades.

Special Mounting Rules for Composite Decks (Trex, TimberTech, Fiberon)

Can you install a pergola on composite deck systems? Yes, absolutely! Composite decking provides a luxurious, low-maintenance finish, but because it is composed of wood fiber and plastic capstock, you must follow two crucial protection steps:

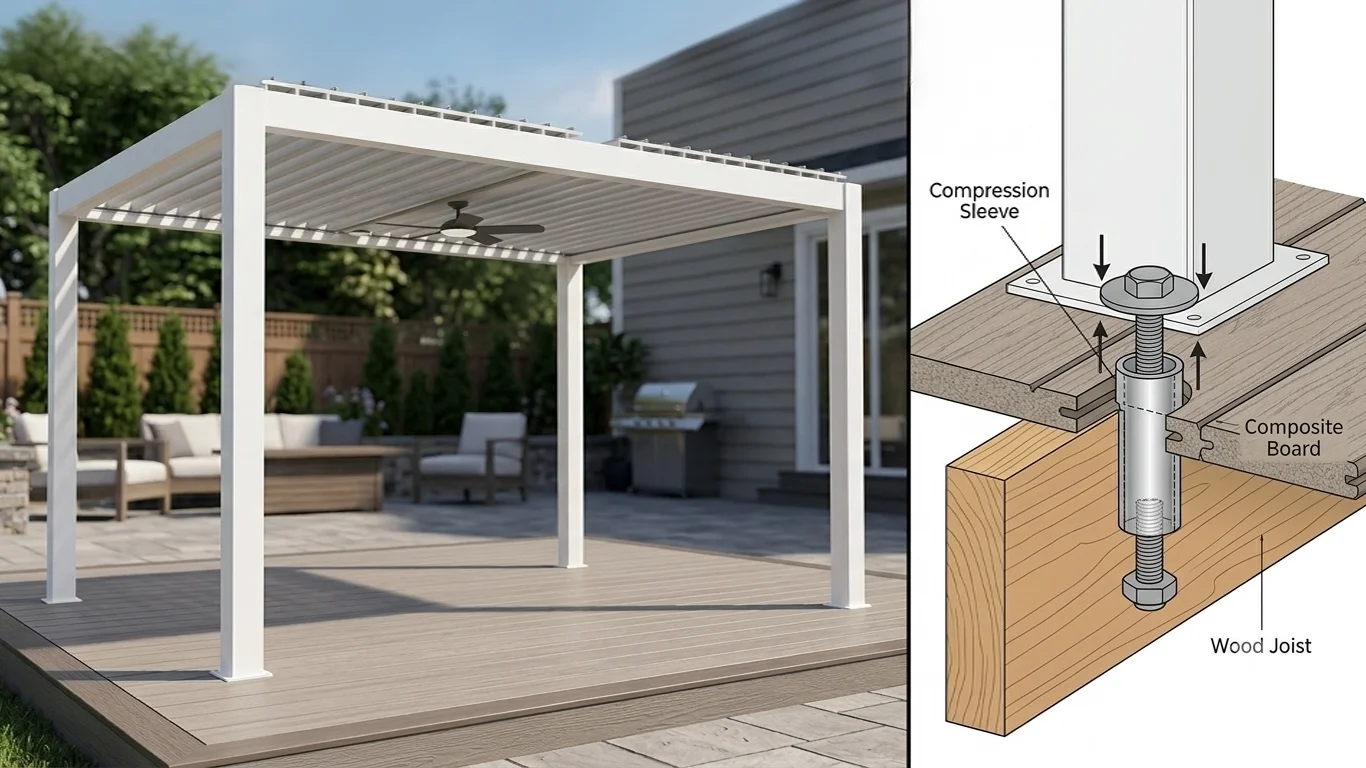
1. Use Compression Sleeves to Prevent Board Crushing

Install compression sleeves between bolts and composite decking to avoid board deformation during pergola installation

Composite decking is pliable under extreme torque. Tightening heavy structural bolts directly against composite caps can crush or dent the boards.

  • Pro Solution: Drill clearance holes through the composite board and insert metal or PVC compression sleeves down to the wood joist below. The sleeve bears the mechanical bolt pressure so your composite boards never crush.

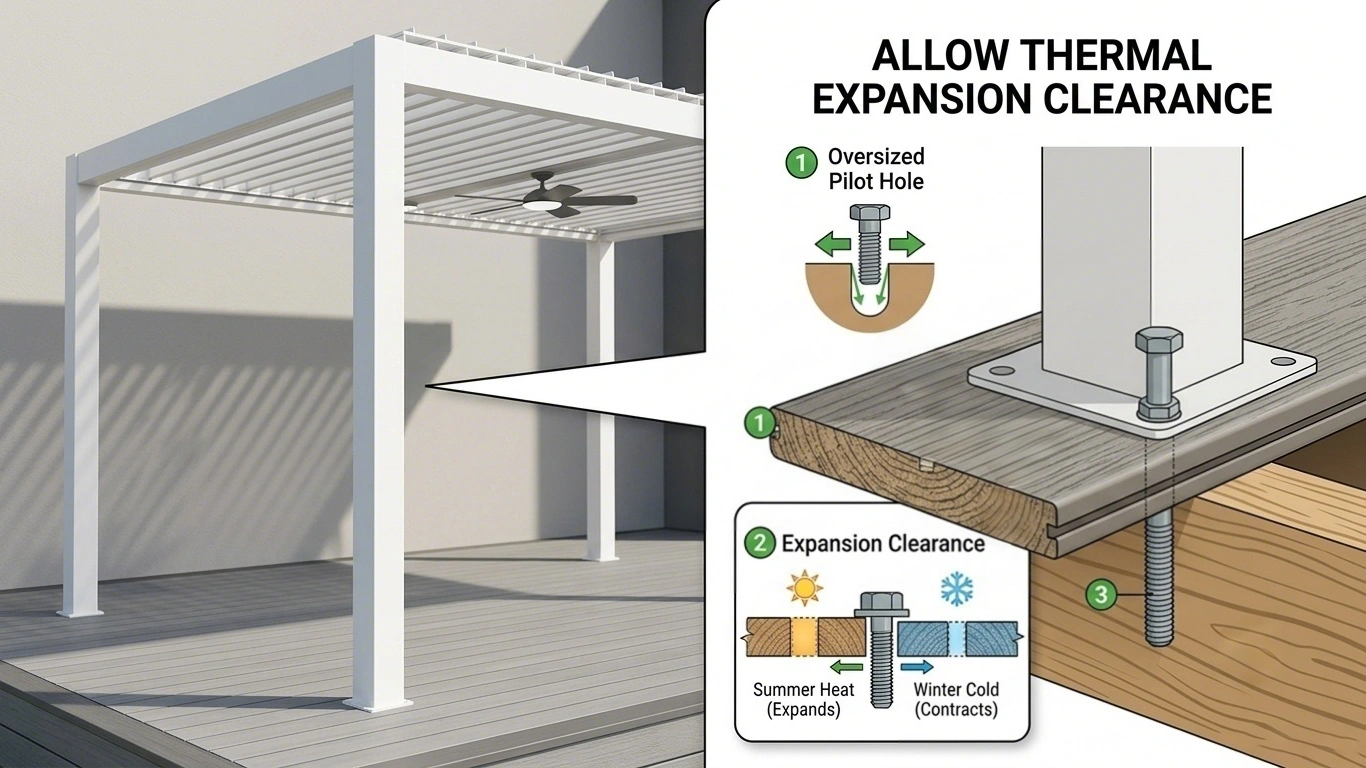
2. Allow Thermal Expansion Clearance

Drill oversized pilot holes for thermal expansion to prevent composite deck cracking during pergola installation

Composite lumber expands and contracts with summer heat and winter cold. Drill pilot clearance holes slightly larger than the bolt diameter to allow natural thermal movement without cracking the composite cap.

Wind Resistance & Aerodynamic Uplift Protection

Wind uplift creates significant upward tension on elevated decks. A traditional fixed-roof gazebo acts like an upside-down parachute during windstorms, pulling violently at the deck footings.

Why Rotating Louvers Protect Your Deck Architecture

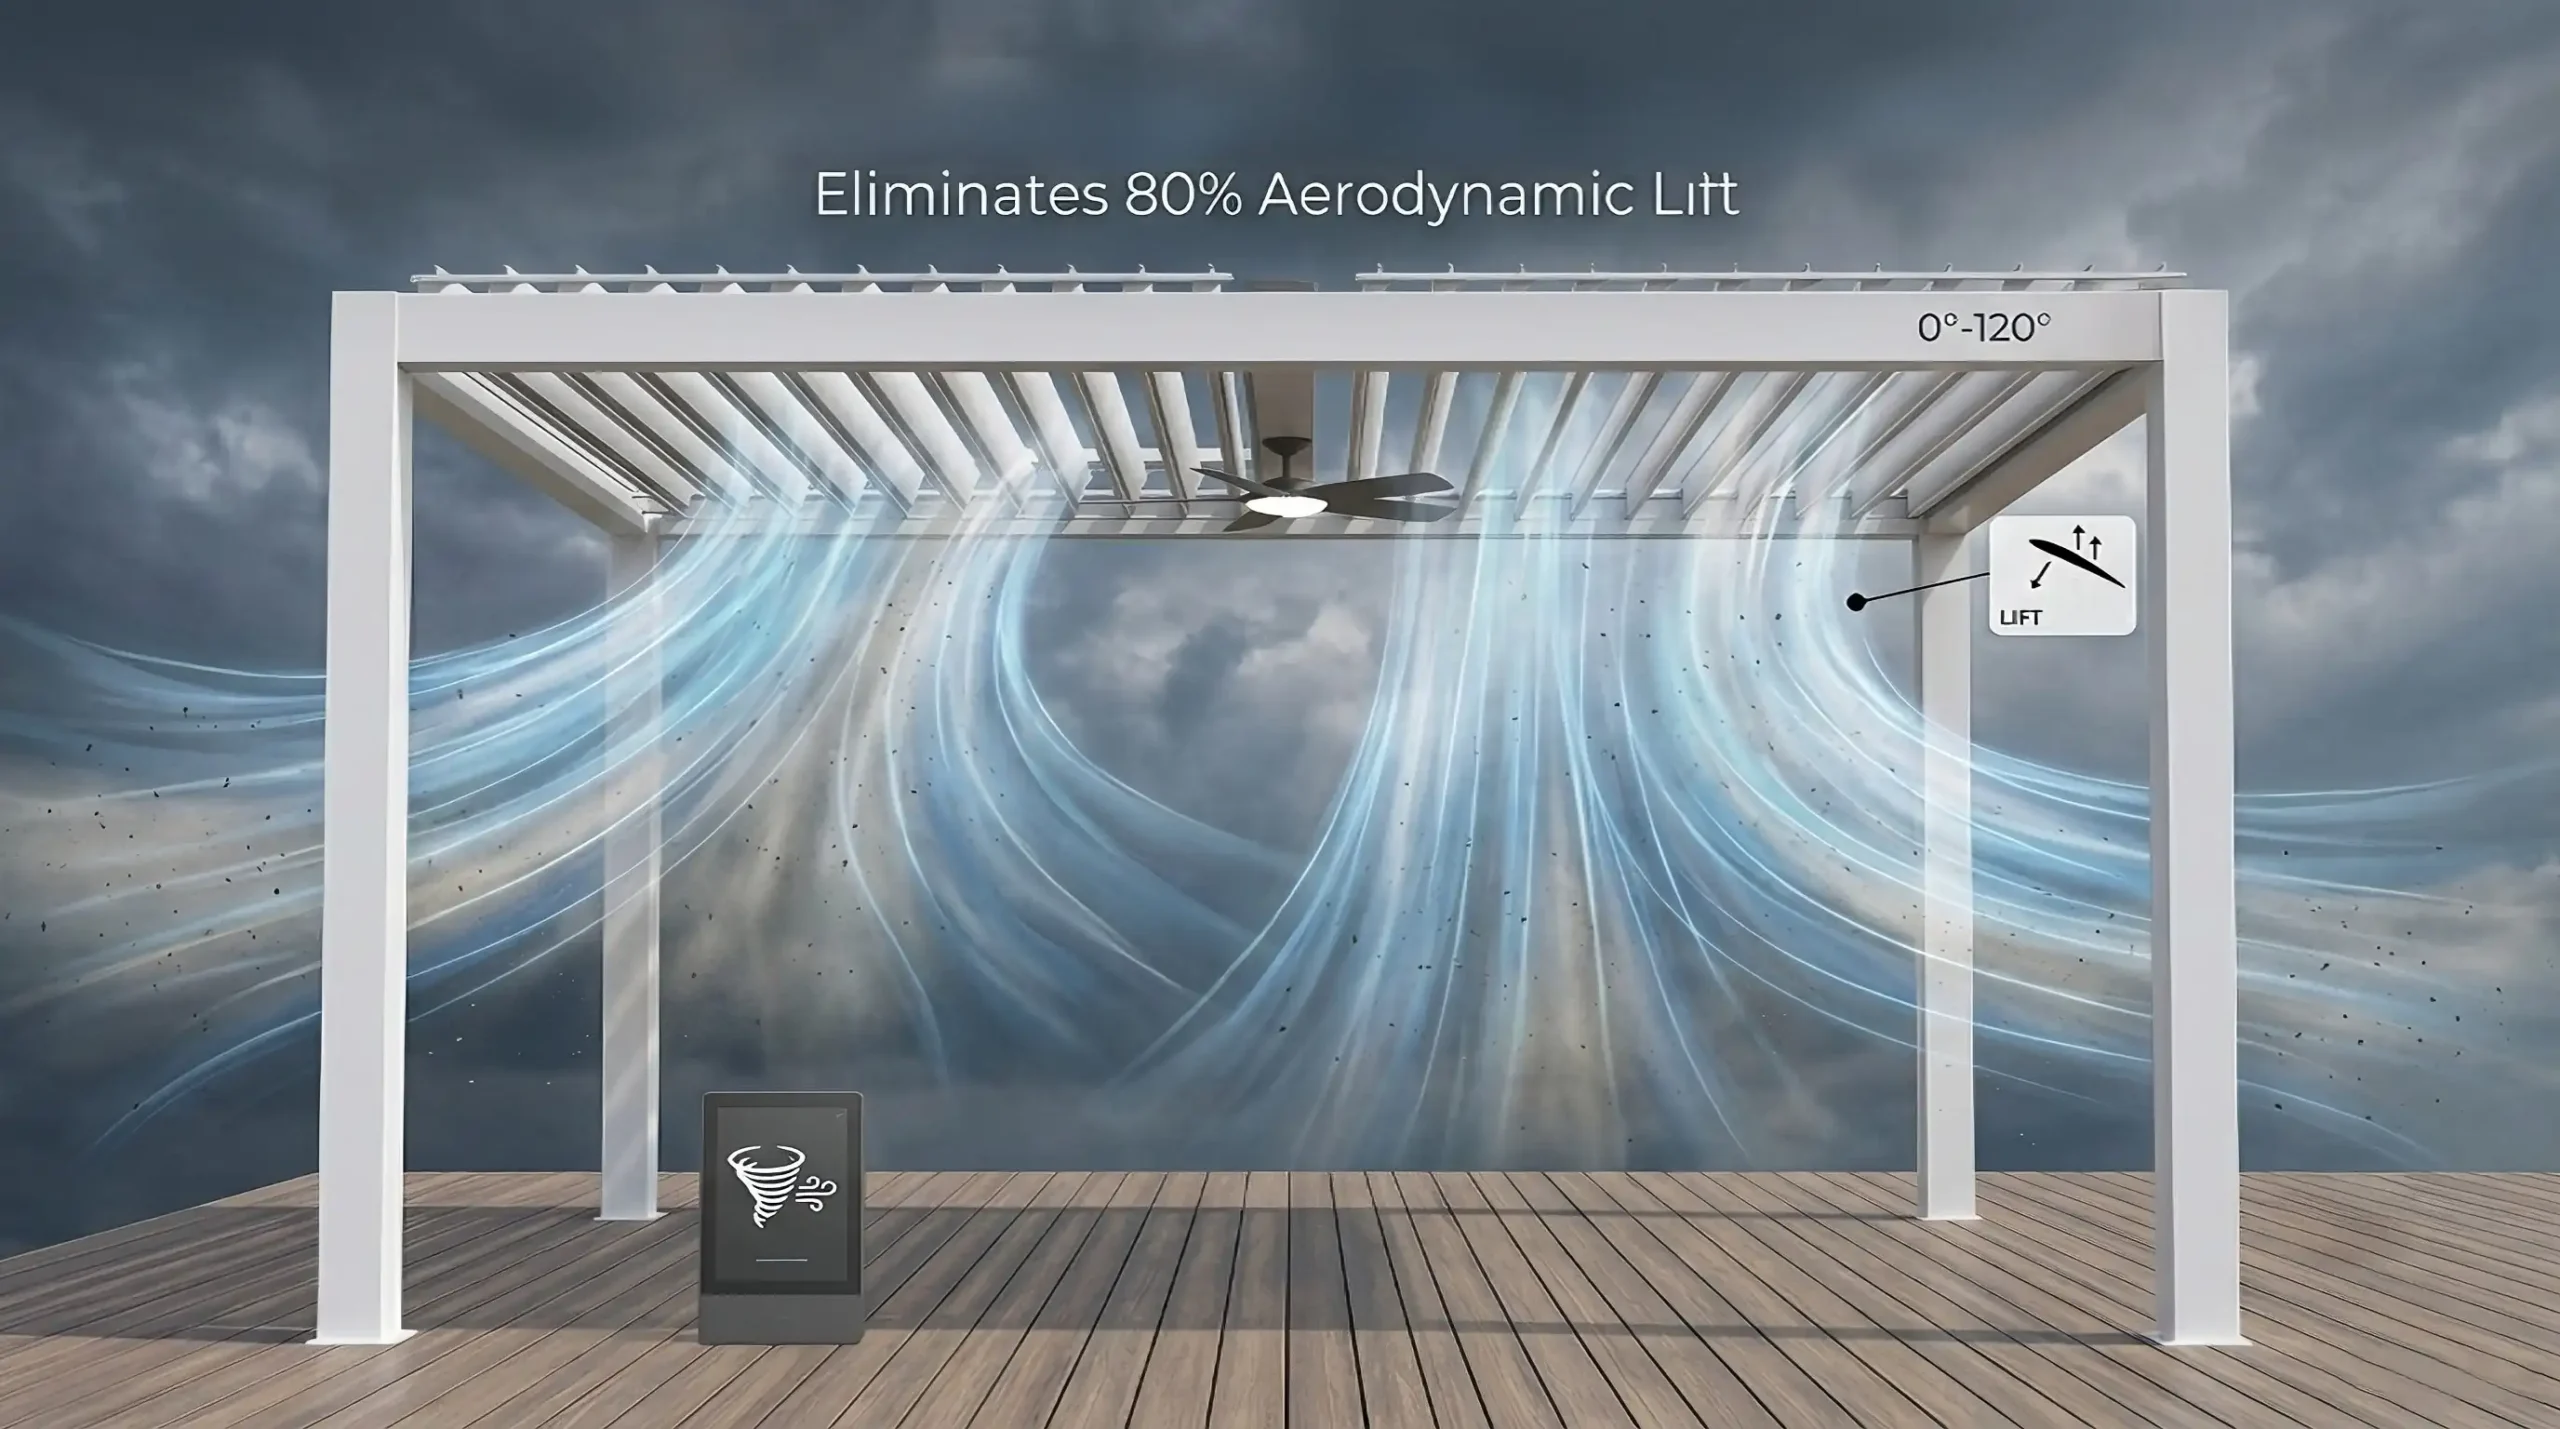
Modern motorized pergolas feature 0° to 120° rotating louvers.

When severe weather or hurricane-force wind gusts are forecast:

Adjustable louver pergola reduces 80% wind lift by letting wind flow through, safeguarding pergola and deck
  • Louvers can be rotated completely open, allowing high-velocity wind to pass harmlessly through the roof frame.
  • Opening the louvers eliminates up to 80% of aerodynamic lift forces, protecting both your pergola and the underlying deck framework.

👉 Real Case Study: See how an elevated lakeside deck installation weathered intense wind loads in our case study: Pergola on Deck: Solar-Powered Lakeside Home Upgrade.

Why Solar-Powered Pergolas are Ideal for Elevated Decks

Running high-voltage electrical conduit through an existing deck structure often requires cutting open finished under-deck ceilings or hiring expensive electricians.

An engineered solar-powered aluminum pergola eliminates this hassle entirely:

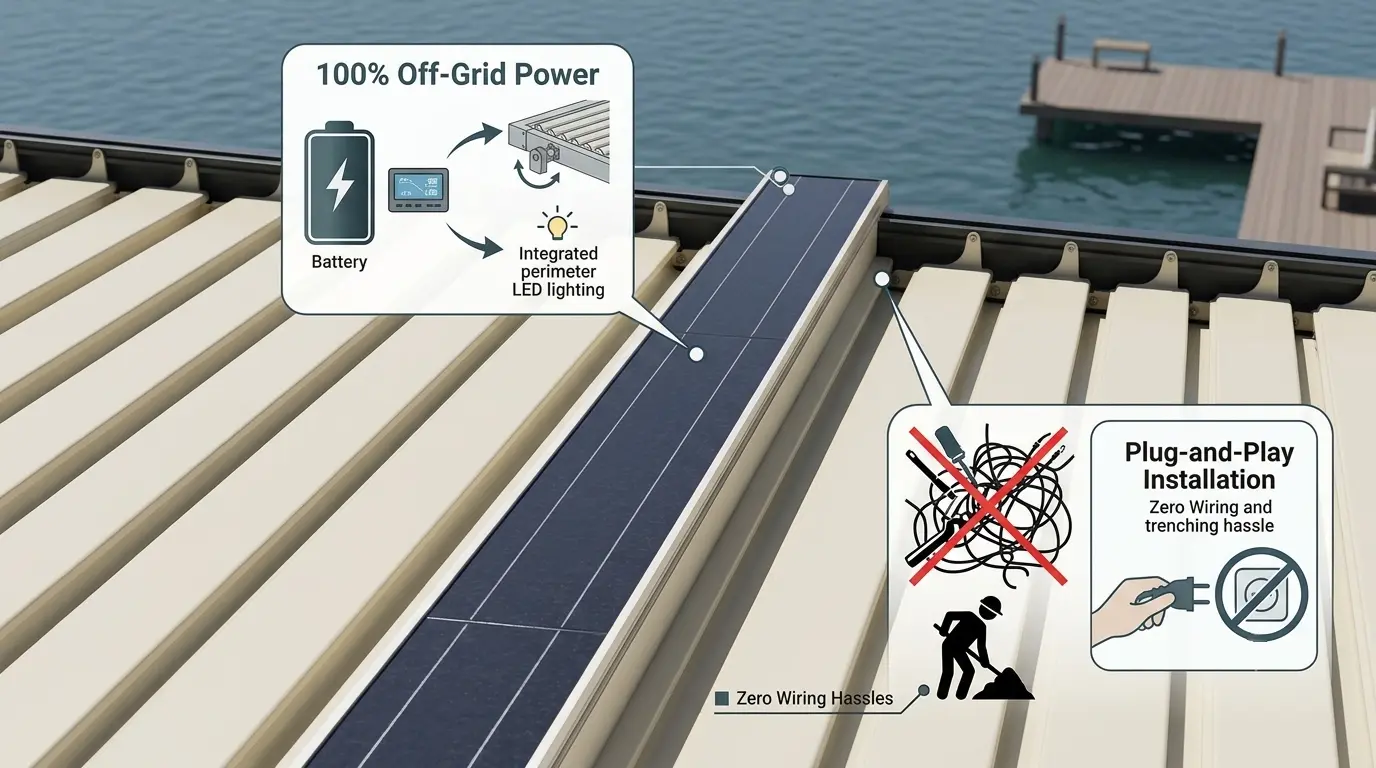
Solar pergola runs fully off-grid with solar panels and batteries-plug-and-play setup needs no wiring or trenching
  • 100% Off-Grid Power: Integrated solar panels quietly charge an internal lithium battery pack to power motorized louver rotation, integrated LED perimeter lighting, and privacy shades.
  • Zero Wiring Code Hassles: No electrical permits or under-deck trenching needed—plug-and-play operation straight out of the box.

DIY vs. Professional Installation: What Fits Your Project?

Installing a deck pergola can be approached in two ways:

  • Easy DIY Project: Free-standing 10x10 or 10x12 aluminum pergola kits on single-story wood decks with easy under-deck joist access.

  • Requires Professional Contractor: Multi-bay commercial units, second-story rooftop decks, house wall attachments, or complex composite deck retrofits.

For a full breakdown of labor costs, tool requirements, and hiring checklists, read: DIY vs. Professional Enclosed Pergola Installation: Pros, Cons, and Cost.

Pre-Installation Safety Checklist

Before driving your first fastener, complete this structural safety audit:

  • Verify Building Permits: Check local municipal building codes for deck additions over 200 sq. ft.

  • Inspect Joists for Decay: Examine ledger boards and joists for rot, soft spots, or rusted joist hangers.

  • Ensure Structural Joist Penetration: Confirm mounting bolts penetrate directly into structural joists or solid blocking.

  • Select Lightweight Engineered Aluminum: Choose an engineered solar-powered aluminum pergola to minimize permanent dead load on elevated platforms.

Back to top of page
crossmenu